Imagine you have a collection of items you would like to upload to TOTA. Maybe you’ve inherited a historic collection of family letters and photographs or you represent a cultural institution that wants to contribute artifact photographs to TOTA. Using TOTA’s bulk uploading tools, you can queue multiple files to upload at once.
Let’s start with written content, like that collection of letters. If you have transcribed the letters into individual Word files (.docx), you can then upload those files. To make it easier to tell the files apart once you’ve uploaded them, include a different image in each one (you can remove the images later if you like).
You can upload one file at a time or, if the files are all saved in the same folder on your computer, you can upload several at once. Click on the Articles link in the sidebar to see all the articles you’ve written at TOTA. Click on the Upload Article button opposite the page title; it’s right next to the orange Create Article button.
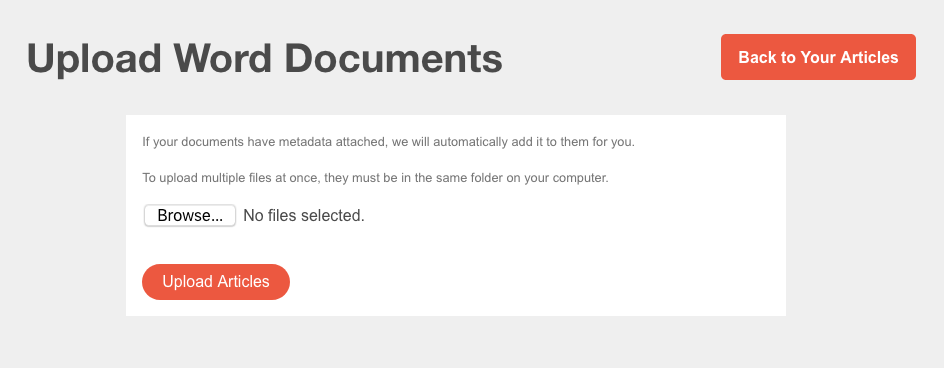
This will take you to the Upload Word Documents page:
Use the Browse… button (it’s called Choose Files on some computers) to access your computer’s file system. Navigate to the folder the file or files are in, select the one(s) you want to upload and confirm the selection. Then click the orange Upload Articles button. The upload process may take a few moments, depending on things like the number of files, the file sizes, and your internet connection speed. You might have time to stand up and stretch or you might have time to go get yourself more coffee and let the dog out. (We recommend not attempting to upload more than 50 files at one time.)
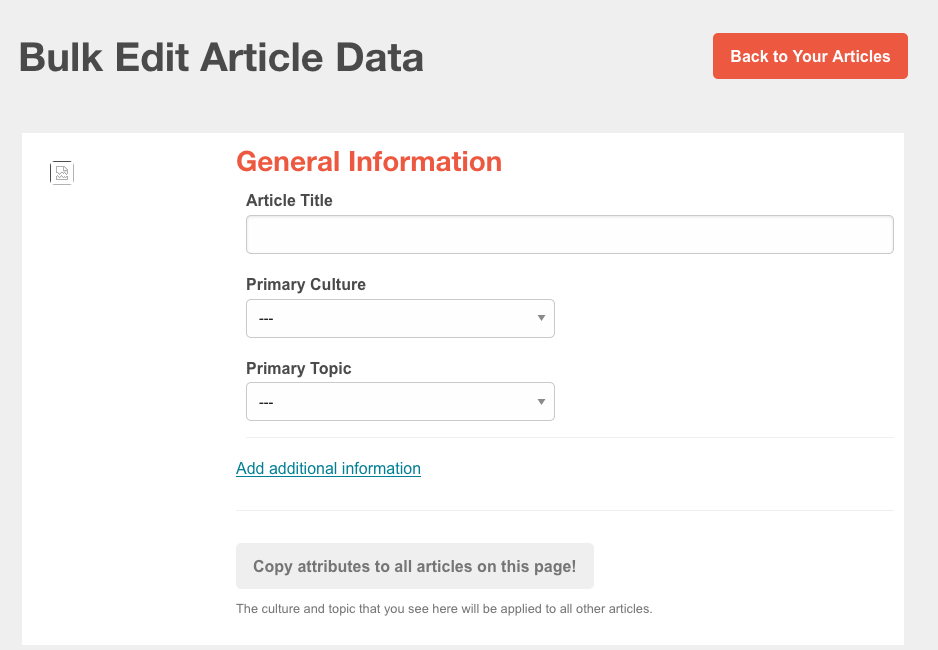
If you have uploaded only one file, when the upload is complete, you’ll be at the Edit Article page for that article. It’s always a good idea to look over the file in the editor to be sure that it was imported correctly. However, if you’ve uploaded several files at once, you’ll be taken to the Bulk Edit Article Data page.
This is where it will be helpful if you have included an image in each file you are uploading, since the image will give you a hint as to which file is which. Give each article a title. If you like, you can also select a culture and a topic. The Add additional information link will reveal all the metadata fields where you can assign the files to a group if desired.
For our example of a collection of historical letters, perhaps you would name each letter with the recipient and the date. If you wanted to share them with your family group, the Group assignment is behind the “Add additional information” link. If there are metadata attributes that all the uploaded articles have in common, you can enter those for one file and use the Copy attributes to all articles on this page! button to assign that information to all the files. Do this step before you enter in any information that is specific to individual files so that you don’t accidentally overwrite the specific with the general.
Once you’ve updated all the metadata as much you want, save the information by clicking the orange Update Articles button at the bottom of the page.
When the update is complete, a green “Success!” alert will display for a few seconds at the top of your browser window. Once you’ve seen this, you can use the Back to Your Articles button to go back to your list of articles.
If you are uploading primarily images, the process is very similar. Start by choosing the Images link in the sidebar to go to Your Images and from there click the orange Upload Image(s) button opposite the page title.
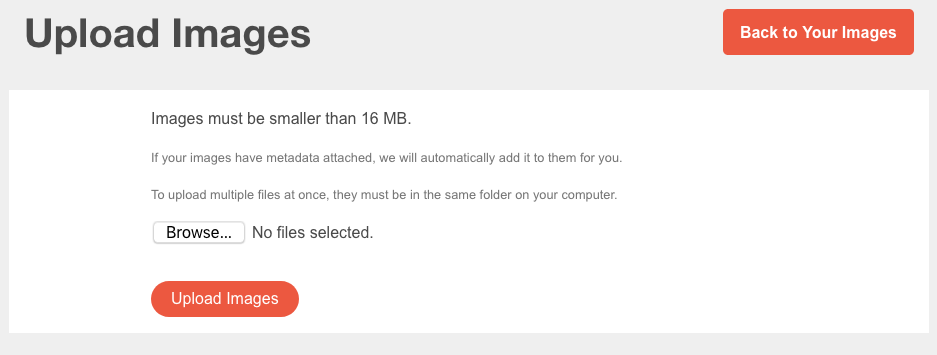
This will take you to the Upload Images page:
As before, if you have multiple images to upload, be sure they are all in the same folder on your computer first. All images must be smaller than 16 MB. Use the Browse… button (it’s called Choose Files on some computers) to access your computer’s file system. Navigate to the folder the file or files are in, select the one(s) you want to upload and confirm the selection. Then click the orange Upload Images button. The upload process may take a few moments, depending on things like the number of files, the file sizes, and your internet connection speed. Again, you might have enough time to get in a good stretch or you might have enough to get a snack from the kitchen now that you’ve finished the coffee. (We recommend not attempting to upload more than 50 files at one time.)
If you have uploaded only one file, when the upload is complete, you’ll be at the Edit Image page for that article. However, if you have uploaded several files at once, you’ll be taken to the Bulk Edit Image Data page where you can add or edit the metadata for the files as appropriate. This process is the same for images as it is for articles, all the way to the green “Success” alert.
With TOTA’s bulk uploading tools, you can share your great-grandparents’ letters and the photographs from last summer’s reunion with your family group. The same tools will also let you upload collections of recipes, academic articles, or photography collections to share with the wider TOTA community.
If you have any additional questions about bulk uploading or anything else on TOTA, please contact Support for assistance.
About TOTA
TOTA.world provides cultural information and sharing across the world to help you explore your Family’s Cultural History and create deep connections with the lives and cultures of your ancestors.


